Introduction 00:00
At the end of the Raging Sea lesson, I suggested adding reflection for those who wanted to go further.
By now, you probably realized how hard this task is.
Fortunately, now that we know how basic shading works, we can apply our knowledge to the raging sea. And even better, we can re-use the light functions we prepared in the previous lesson.
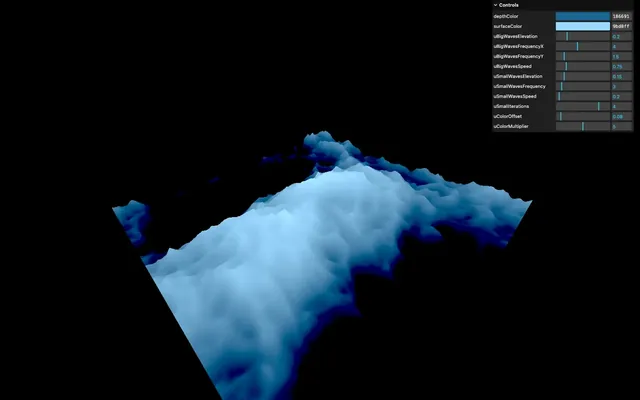
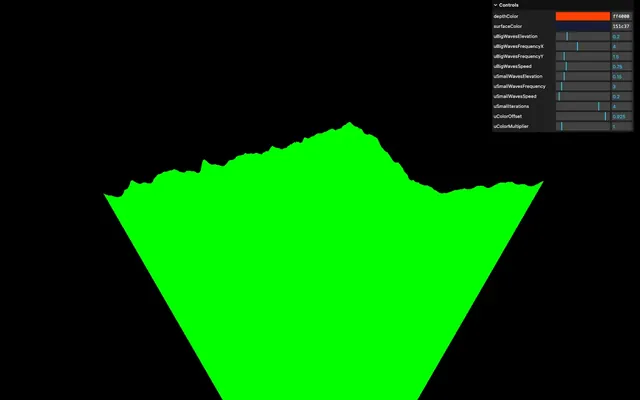
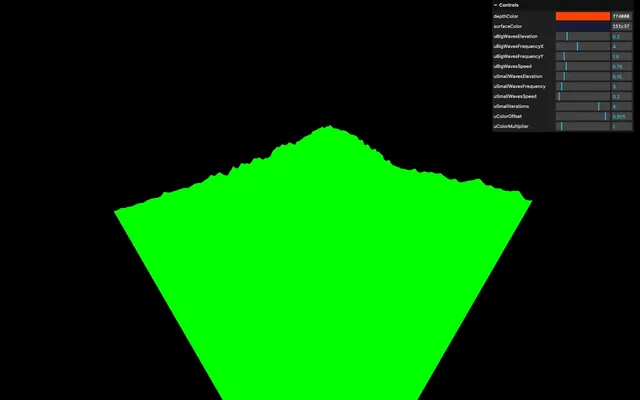
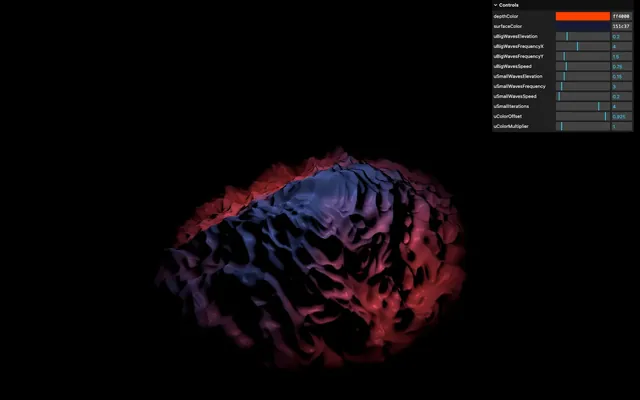
Here’s the final result:

It’s also the opportunity to make the water look even more epic as if there was demonic stuff happening under the sea.
Setup 01:14
The starter is exactly the same as the Raging Sea project as we left it:
- A well-subdivided plane for the sea
- Custom shaders located in the
src/shaders/water/folder to handle the up and down animation and the color - An instance of
lil-guiwith some tweaks to control the shader - The
vite-plugin-glsldependency to handle GLSL files OrbitControlsto rotate around
Tweak the initial setting 02:12
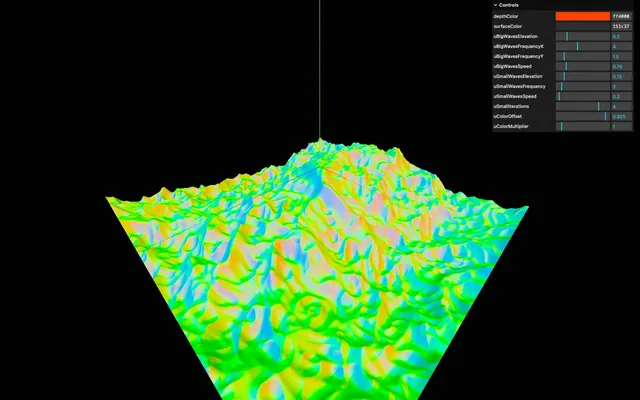
We are going to tweak our initial setting to suit what’s coming and to make the water look a little more epic as shown before.
The initial colors were chosen to highlight the tip of the waves and create contrast. This won’t be necessary because the light shading is going to add a lot of realistic and natural contrast.
Let’s change the depthColor to #ff4000 and the surfaceColor to #151c37:
debugObject.depthColor = '#ff4000'
debugObject.surfaceColor = '#151c37'

We now need to update the gradient position and amplitude.
On the waterMaterial uniforms, change the uColorOffset to 0.925 and the uColorMultiplier to 1:
const waterMaterial = new THREE.ShaderMaterial({
    // ...
    uniforms:
    {
        // ...
        uColorOffset: { value: 0.925 },
        uColorMultiplier: { value: 1 }
    }
})
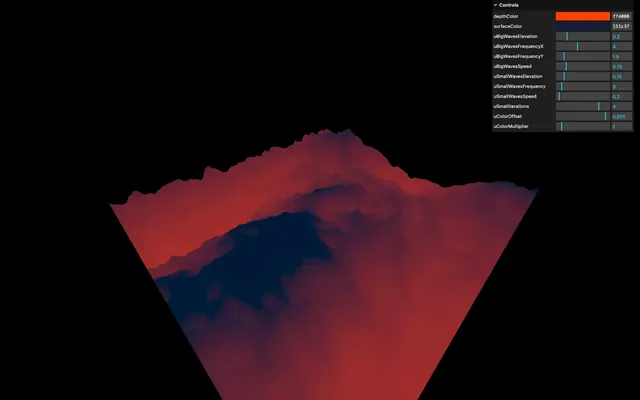
It already looks a lot more epic.
Prepare the shader 04:03
Before adding any light shading, we need to prepare our shader and organize things a little.
The starter could have come prepared, but I wanted you to start from the exact end of the Raging Sea lesson.
Perlin function
Rename the cnoise function with perlinClassic3D and don’t forget to also change where you call it in main():
float perlinClassic3D(vec3 P)
{
    // ...
}

void main()
{
    // ...

    for(float i = 1.0; i <= uSmallIterations; i++)
    {
        elevation -= abs(perlinClassic3D(vec3(modelPosition.xz * uSmallWavesFrequency * i, uTime * uSmallWavesSpeed)) * uSmallWavesElevation / i);
    }

    // ...
}
cnoise stands for classic noise which is correct, but not accurate enough.
Next, we are going to put it in a different file so that it doesn’t take up most of the vertex shader.
In the src/shaders/ folder, create an includes/ folder.
In the includes/ folder, create a perlinClassic3D.glsl file and add the function accompanied by the permute, taylorInvSqrt and fade functions:
// Classic Perlin 3D Noise
// by Stefan Gustavson
//
vec4 permute(vec4 x)
{
    return mod(((x*34.0)+1.0)*x, 289.0);
}
vec4 taylorInvSqrt(vec4 r)
{
    return 1.79284291400159 - 0.85373472095314 * r;
}
vec3 fade(vec3 t)
{
    return t*t*t*(t*(t*6.0-15.0)+10.0);
}

float perlinClassic3D(vec3 P)
{
    vec3 Pi0 = floor(P); // Integer part for indexing
    vec3 Pi1 = Pi0 + vec3(1.0); // Integer part + 1
    Pi0 = mod(Pi0, 289.0);
    Pi1 = mod(Pi1, 289.0);
    vec3 Pf0 = fract(P); // Fractional part for interpolation
    vec3 Pf1 = Pf0 - vec3(1.0); // Fractional part - 1.0
    vec4 ix = vec4(Pi0.x, Pi1.x, Pi0.x, Pi1.x);
    vec4 iy = vec4(Pi0.yy, Pi1.yy);
    vec4 iz0 = Pi0.zzzz;
    vec4 iz1 = Pi1.zzzz;

    vec4 ixy = permute(permute(ix) + iy);
    vec4 ixy0 = permute(ixy + iz0);
    vec4 ixy1 = permute(ixy + iz1);

    vec4 gx0 = ixy0 / 7.0;
    vec4 gy0 = fract(floor(gx0) / 7.0) - 0.5;
    gx0 = fract(gx0);
    vec4 gz0 = vec4(0.5) - abs(gx0) - abs(gy0);
    vec4 sz0 = step(gz0, vec4(0.0));
    gx0 -= sz0 * (step(0.0, gx0) - 0.5);
    gy0 -= sz0 * (step(0.0, gy0) - 0.5);

    vec4 gx1 = ixy1 / 7.0;
    vec4 gy1 = fract(floor(gx1) / 7.0) - 0.5;
    gx1 = fract(gx1);
    vec4 gz1 = vec4(0.5) - abs(gx1) - abs(gy1);
    vec4 sz1 = step(gz1, vec4(0.0));
    gx1 -= sz1 * (step(0.0, gx1) - 0.5);
    gy1 -= sz1 * (step(0.0, gy1) - 0.5);

    vec3 g000 = vec3(gx0.x,gy0.x,gz0.x);
    vec3 g100 = vec3(gx0.y,gy0.y,gz0.y);
    vec3 g010 = vec3(gx0.z,gy0.z,gz0.z);
    vec3 g110 = vec3(gx0.w,gy0.w,gz0.w);
    vec3 g001 = vec3(gx1.x,gy1.x,gz1.x);
    vec3 g101 = vec3(gx1.y,gy1.y,gz1.y);
    vec3 g011 = vec3(gx1.z,gy1.z,gz1.z);
    vec3 g111 = vec3(gx1.w,gy1.w,gz1.w);

    vec4 norm0 = taylorInvSqrt(vec4(dot(g000, g000), dot(g010, g010), dot(g100, g100), dot(g110, g110)));
    g000 *= norm0.x;
    g010 *= norm0.y;
    g100 *= norm0.z;
    g110 *= norm0.w;
    vec4 norm1 = taylorInvSqrt(vec4(dot(g001, g001), dot(g011, g011), dot(g101, g101), dot(g111, g111)));
    g001 *= norm1.x;
    g011 *= norm1.y;
    g101 *= norm1.z;
    g111 *= norm1.w;

    float n000 = dot(g000, Pf0);
    float n100 = dot(g100, vec3(Pf1.x, Pf0.yz));
    float n010 = dot(g010, vec3(Pf0.x, Pf1.y, Pf0.z));
    float n110 = dot(g110, vec3(Pf1.xy, Pf0.z));
    float n001 = dot(g001, vec3(Pf0.xy, Pf1.z));
    float n101 = dot(g101, vec3(Pf1.x, Pf0.y, Pf1.z));
    float n011 = dot(g011, vec3(Pf0.x, Pf1.yz));
    float n111 = dot(g111, Pf1);

    vec3 fade_xyz = fade(Pf0);
    vec4 n_z = mix(vec4(n000, n100, n010, n110), vec4(n001, n101, n011, n111), fade_xyz.z);
    vec2 n_yz = mix(n_z.xy, n_z.zw, fade_xyz.y);
    float n_xyz = mix(n_yz.x, n_yz.y, fade_xyz.x);
    return 2.2 * n_xyz;
}
Back in vertex.glsl, replace all these parts with an #include:
#include ../includes/perlinClassic3D.glsl

void main()
{
    // ...
}
Comments
Add some comments in the vertex shader to separate things a little:
void main()
{
    // Base position
    vec4 modelPosition = modelMatrix * vec4(position, 1.0);

    // Elevation
    float elevation = sin(modelPosition.x * uBigWavesFrequency.x + uTime * uBigWavesSpeed) *
                      sin(modelPosition.z * uBigWavesFrequency.y + uTime * uBigWavesSpeed) *
                      uBigWavesElevation;

    for(float i = 1.0; i <= uSmallIterations; i++)
    {
        elevation -= abs(perlinClassic3D(vec3(modelPosition.xz * uSmallWavesFrequency * i, uTime * uSmallWavesSpeed)) * uSmallWavesElevation / i);
    }

    modelPosition.y += elevation;

    // Final position
    vec4 viewPosition = viewMatrix * modelPosition;
    vec4 projectedPosition = projectionMatrix * viewPosition;
    gl_Position = projectedPosition;

    // Varyings
    vElevation = elevation;
}
Do the same in the fragment shader:
void main()
{
    // Base color
    float mixStrength = (vElevation + uColorOffset) * uColorMultiplier;
    vec3 color = mix(uDepthColor, uSurfaceColor, mixStrength);

    // Final color
    gl_FragColor = vec4(color, 1.0);
    #include <colorspace_fragment>
}
It might sound far-fetched, but we are going to add some code to the vertex.glsl and it’s always good to keep things organized before it gets complex.
Smoothstep
In the fragment shader, we are going to enhance the gradient’s feel by applying a smoothstep to mixStrength:
void main()
{
    // Base color
    float mixStrength = (vElevation + uColorOffset) * uColorMultiplier;
    mixStrength = smoothstep(0.0, 1.0, mixStrength);
    // ...
}
Tone mapping
Although we are not using any tone mapping on our renderer right now, let’s anticipate it and add the tonemapping_fragment chunk right before the colorspace_fragment chunk:
void main()
{
    // ...

    // Final color
    gl_FragColor = vec4(color, 1.0);
    #include <tonemapping_fragment>
    #include <colorspace_fragment>
}
Lights
Finally, since we are going to use lights, let’s add the lights included from the previous lesson to our includes/ folder.
src/shaders/includes/ambientLight.glsl:
vec3 ambientLight(vec3 lightColor, float lightIntensity)
{
    return lightColor * lightIntensity;
}src/shaders/includes/directionalLight.glsl:
vec3 directionalLight(vec3 lightColor, float lightIntensity, vec3 normal, vec3 lightPosition, vec3 viewDirection, float specularPower)
{
    vec3 lightDirection = normalize(lightPosition);
    vec3 lightReflection = reflect(- lightDirection, normal);

    // Shading
    float shading = dot(normal, lightDirection);
    shading = max(0.0, shading);

    // Specular
    float specular = - dot(lightReflection, viewDirection);
    specular = max(0.0, specular);
    specular = pow(specular, specularPower);

    return lightColor * lightIntensity * (shading + specular);
}src/shaders/includes/pointLight.glsl:
vec3 pointLight(vec3 lightColor, float lightIntensity, vec3 normal, vec3 lightPosition, vec3 viewDirection, float specularPower, vec3 position, float lightDecay)
{
    vec3 lightDelta = lightPosition - position;
    float lightDistance = length(lightDelta);
    vec3 lightDirection = normalize(lightDelta);
    vec3 lightReflection = reflect(- lightDirection, normal);

    // Shading
    float shading = dot(normal, lightDirection);
    shading = max(0.0, shading);

    // Specular
    float specular = - dot(lightReflection, viewDirection);
    specular = max(0.0, specular);
    specular = pow(specular, specularPower);

    // Decay
    float decay = 1.0 - lightDistance * lightDecay;
    decay = max(0.0, decay);

    return lightColor * lightIntensity * decay * (shading + specular);
}
Directional light 11:52
We are going to add a directional light source and if you remember from the previous lesson, we need the normal and the view direction.
Normal
Let’s start with the normal.
In vertex.glsl, create a vec3 vNormal varying:
varying vec3 vNormal;This time, let’s not make the usual mistake of forgetting to apply the model transformation to the normal.
Apply the modelMatrix to normal, set it’s fourth value to 0.0 and assign it to vNormal but only swizzle the xyz since vNormal is a vec3:
void main()
{
    // ...

    // Varyings
    vElevation = elevation;
    vNormal = (modelMatrix * vec4(normal, 0.0)).xyz;
}
In fragment.glsl, again, let’s not make the mistake of forgetting to normalize the normal again.
Retrieve the vNormal varying, use normalize on it, and save it as a vec3 normal:
varying float vElevation;
varying vec3 vNormal;

void main()
{
    vec3 normal = normalize(vNormal);

    // ...
}
Our normal should be ready. Right?
Well not exactly, but let’s move forward and we will see what’s wrong soon.
View direction
The next thing we need for the light is the view direction. It’s a vector from the camera to the position of the fragment. But first, we need the fragment position.
In vertex.glsl, create a vec3 vPosition varying and assign it the modelPosition.xyz:
varying float vElevation;
varying vec3 vNormal;
varying vec3 vPosition;

// ...

void main()
{
    // ...

    // Varyings
    vElevation = elevation;
    vNormal = (modelMatrix * vec4(normal, 0.0)).xyz;
    vPosition = modelPosition.xyz;
}
Retrieve it in fragment.glsl:
varying float vElevation;
varying vec3 vNormal;
varying vec3 vPosition;
Because the view direction is a vector from the camera to the fragment position, we can subtract cameraPosition from vPosition. Don’t forget to normalize it:
void main()
{
    vec3 viewDirection = normalize(vPosition - cameraPosition);
    vec3 normal = normalize(vNormal);

    // ...
}
Implementing the directional light
We should have everything we need for the directional light.
Start by including the directionalLight function:
#include ../includes/directionalLight.glsl

void main()
{
    // ...
}
In main(), create a vec3 light set to vec3(0.0), add the result of directionalLight to it with the following parameters, and multiply it with the color:
void main()
{
    // ...

    // Light
    vec3 light = vec3(0.0);

    light += directionalLight(
        vec3(1.0),            // Light color
        1.0,                  // Light intensity,
        normal,               // Normal
        vec3(-1.0, 0.5, 0.0), // Light position
        viewDirection,        // View direction
        30.0                  // Specular power
    );

    color *= light;

    // ...
}
Not the expected result.
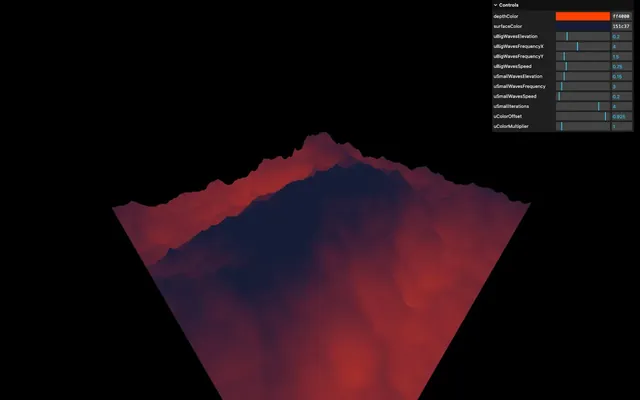
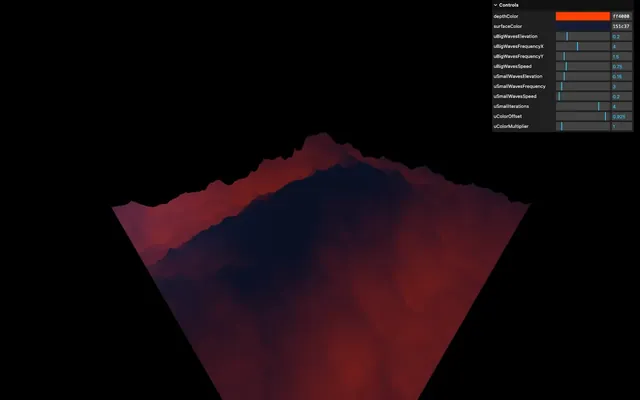
Compute the normal 20:03
If you rotate the camera around, you should notice some variation in the color, like a big reflection not following the real surface of the sea.
What’s happening is that all the normals are currently pointing upward, completely ignoring the actual shape of the waves:
You can test this quite easily by sending the normal to the gl_FragColor:
void main()
{
    // ...
    gl_FragColor = vec4(normal, 1.0);
    // ...
}
If it’s green, it means that the g value is equal to 1.0 and the r and b values are equal to 0.0. Since g corresponds to the y axis, all normals are pointing upward.
The reason is that we are using the normal from the geometry attributes and those normals aren’t affected by the waves we can’t just update the attribute because it needs to change on each frame according to the waves we calculate in the vertex shader.
We need to compute the new orientation ourselves.
Theory
There are multiple ways of computing a normal and it depends on a lot of things, but in the case of a grid, we can use the neighbours technique.
We are going to ignore the normal attribute sent with the geometry and, instead, we are going to calculate the theoretical position of neighbours to calculate the normal.
One neighbour will be further away on the x axis (let’s call it A) and another neighbour will be further away on the z axis (let’s call it B):
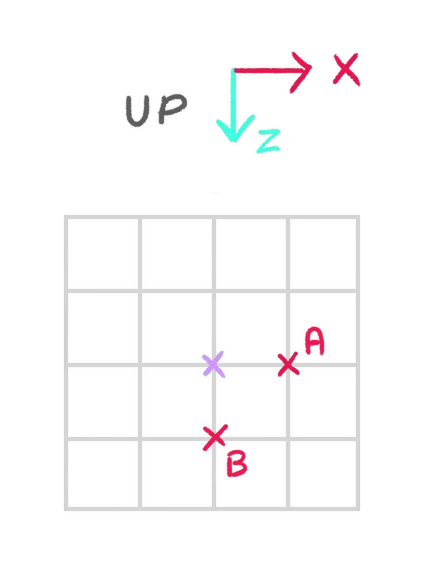
A and B are purely theoretical. We don’t see them, but we calculate their position.
We then update the elevation of those neighbours exactly like we did for the current vertex:
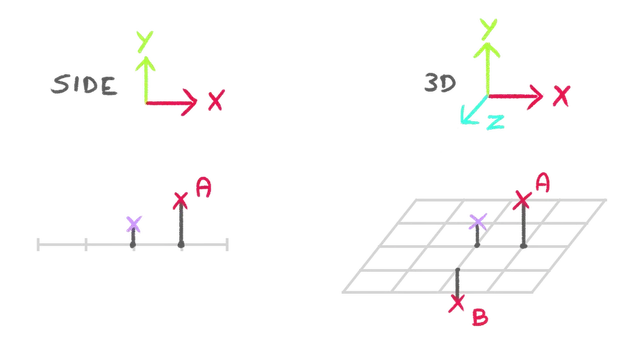
We calculate a vector going from the vertex to the A (let’s call it toA), then the vector going from the vertex to B (let’s call it toB):
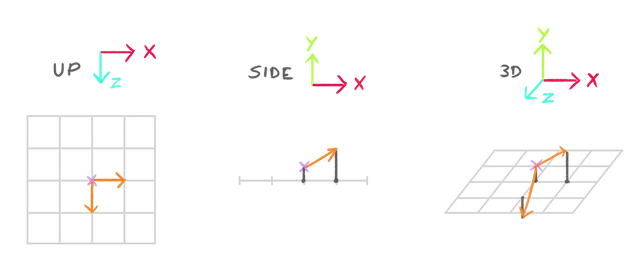
Our computed normal should be the vector perpendicular to both toA and toB and the good news is that there is a function named cross product doing exactly that:
Elevation as a function
Since we are going to need to calculate the elevation of 3 positions (the current vertex and the two neighbours), it would be best to put the calculation in a function so that we don’t repeat too much code.
In vertex.glsl, before the main(), create a waveElevation function accepting a vec3 position as the only parameter and returning a float (the elevation):
float waveElevation(vec3 position)
{

}

void main()
{
    // ...
}
We don’t need to put that code in an include since it’s very specific to this shader.
In that function, put everything related to the elevation calculation, replace modelPosition with position (the parameter), and return the elevation:
float waveElevation(vec3 position)
{
    float elevation = sin(position.x * uBigWavesFrequency.x + uTime * uBigWavesSpeed) *
                      sin(position.z * uBigWavesFrequency.y + uTime * uBigWavesSpeed) *
                      uBigWavesElevation;

    for(float i = 1.0; i <= uSmallIterations; i++)
    {
        elevation -= abs(perlinClassic3D(vec3(position.xz * uSmallWavesFrequency * i, uTime * uSmallWavesSpeed)) * uSmallWavesElevation / i);
    }

    return elevation;
}
In main() replace the whole elevation part with a call to this function and send modelPosition.xyz to it:
void main()
{
    // ...

    // Elevation
    float elevation = waveElevation(modelPosition.xyz);
    modelPosition.y += elevation;

    // ...
}
The waves should work just the same.
Axes helper
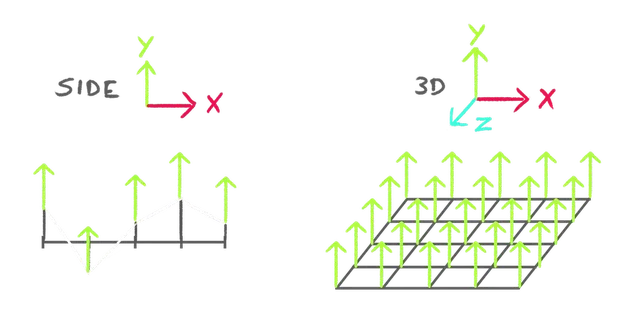
Before calculating the neighbours, we are going to add an AxesHelper to understand where are the axes orientated.
In script.js, right after creating the scene, add an AxesHelper and move it up slightly:
// Scene
const scene = new THREE.Scene()

// Axes helper
const axesHelper = new THREE.AxesHelper()
axesHelper.position.y += 0.25
scene.add(axesHelper)

Neighbours base positions
First of all, we need to determine the distance to the neighbours that we are going to calculate.
We are going to call this distance shift.
We could use the actual distance to the next vertices, but remember that those neighbours are purely theoretical and we can test smaller or bigger distances.
With a smaller shift, we might catch elevation details that won’t be visible in the final waves.
With a bigger shift, we might miss elevation details.
The general rule is to put a shift small enough to catch the details of the smallest wave. Once you can see the result, feel free to tweak the shift in order to get the best result. For now, let’s set it to 0.01.
In vertex.glsl, right before setting the modelPosition, create a float shift variable set to 0.01:
void main()
{
    // Base position
    float shift = 0.01;
    vec4 modelPosition = modelMatrix * vec4(position, 1.0);

    // ...
}
We now need to create the base position of the two neighbours. Let’s start with the neighbour A on the x axis.
We use the modelPosition as the starting point and offset it slightly on the x using shift. Let’s call it modelPositionA and it’s going to be a vec3:
void main()
{
    // Base position
    float shift = 0.01;
    vec4 modelPosition = modelMatrix * vec4(position, 1.0);
    vec3 modelPositionA = modelPosition.xyz + vec3(shift, 0.0, 0.0);

    // ...
}
modelPosition is a vec4 because we apply matrices on it later, but modelPositionA doesn’t need any matrix, which is why a vec3 is enough.
For the moment, we won’t be able to see any visual change. That should not prevent you from saving and checking if you have errors in your shader.
Let’s do the same for the neighbour on the z axis. Call it modelPositionB but move it on the negative z with - shift:
void main()
{
    // Base position
    float shift = 0.01;
    vec4 modelPosition = modelMatrix * vec4(position, 1.0);
    vec3 modelPositionA = modelPosition.xyz + vec3(shift, 0.0, 0.0);
    vec3 modelPositionB = modelPosition.xyz + vec3(0.0, 0.0, - shift);

    // ...
}
You might be wondering: Why on negative z and not positive z? It’s because of the cross product, but we need a few more lines of code before we tackle this topic.
Neighbours elevation
We can now use the waveElevation function to calculate the elevation for the neighbours and update their y axis just like we did for modelPosition:
void main()
{
    // ...

    // Elevation
    float elevation = waveElevation(modelPosition.xyz);
    modelPosition.y += elevation;
    modelPositionA.y += waveElevation(modelPositionA);
    modelPositionB.y += waveElevation(modelPositionB);

    // ...
}
Calculate neighbours directions
Now that we know where the neighbours are, we need the vectors going from the vertex to those neighbours.
As always, the vector going from A to B can be calculated by subtracting A from B:
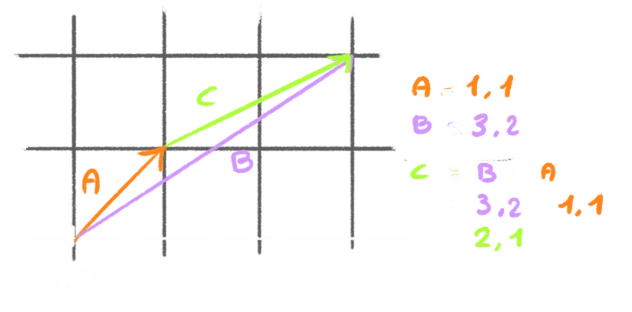
Let’s call the vectors toA and toB:
void main()
{
    // ...

    // Compute normal
    vec3 toA = modelPositionA - modelPosition.xyz;
    vec3 toB = modelPositionB - modelPosition.xyz;

    // ...
}
We are going to use those vectors with a cross product function which requires the vectors to be normalised (of length 1) which we can do by calling normalize:
void main()
{
    // ...

    // Compute normal
    vec3 toA = normalize(modelPositionA - modelPosition.xyz);
    vec3 toB = normalize(modelPositionB - modelPosition.xyz);

    // ...
}
Compute the normal
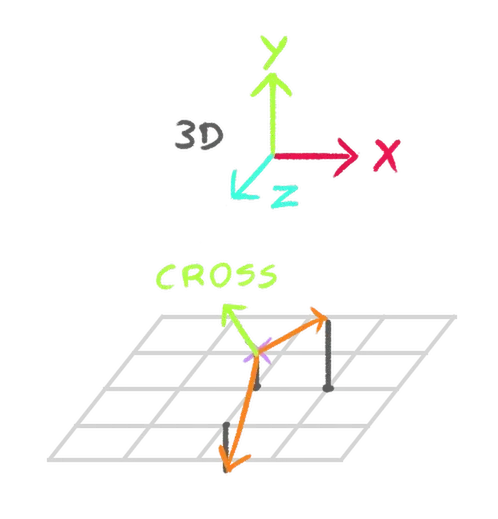
We are ready to compute the normal using the cross product function we’ve been talking about for a while. But before we do that, let’s try to understand and visualize this function.
The cross product outputs a vector perpendicular to the two input vectors.
One easy and “handy” way to visualize it is to use your right hand. Be careful, this won’t work with the left hand.
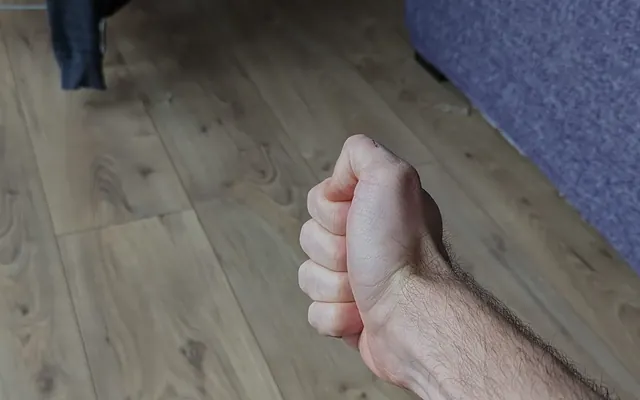
Put your right hand in front of you and close your fist:
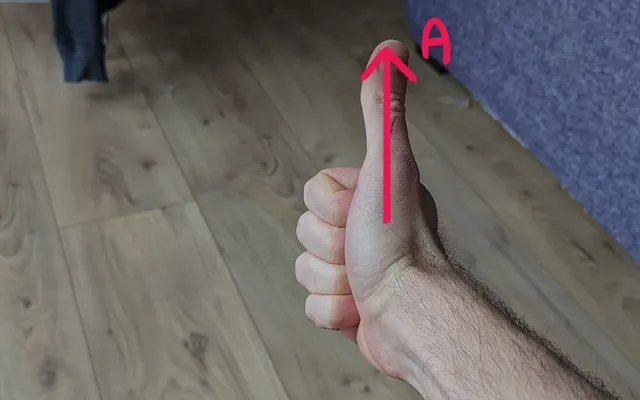
Open your thumb up, this is your neighbour A:
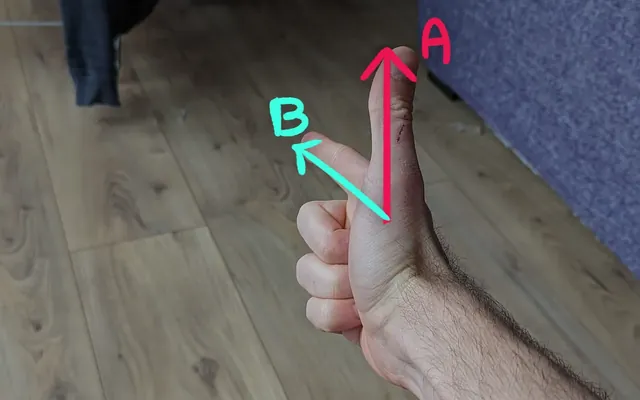
Open your index pointing forward, this is your neighbour B:
Now open your middle finger at a 90° angle, this is your cross product.
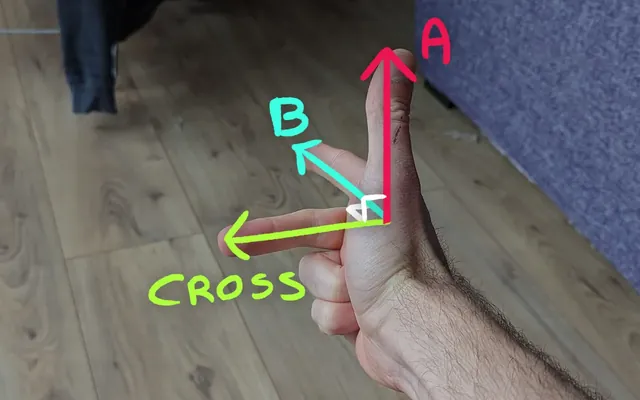
And this is how you visualize where your cross product will be according to the A and B directions.
You can move your hand, you can tighten the angle between the thumb and the index finger, but as long as your middle finger maintains a 90° angle with both, then that’s the cross product.
And this is why we shifted the neighbour B on negative z and not positive z. Try to rotate your hand around to match the A and the B neighbours and you’ll notice that with positive z, the cross product would be pointing downward.
Enough talking and hand gestures, let’s compute that normal.
Create a vec3 computeNormal variable, call the cross function, and send it toA and toB:
void main()
{
    // ...

    // Compute normal
    vec3 toA = normalize(modelPositionA - modelPosition.xyz);
    vec3 toB = normalize(modelPositionB - modelPosition.xyz);
    vec3 computedNormal = cross(toA, toB);

    // ...
}
Assign it to vNormal:
void main()
{
    // ...
    vNormal = computedNormal;
    // ...
}
And that’s a good-looking normal.
It’s still mostly green because the surface is generally pointing upward, but we get variations according to the orientation of the surface.
Final touch 48:35
We are almost done. Let’s get back our base color and improve a little on it.
Remove the normal attribute
Since we are calculating the normal ourselves, we can remove the normal attribute from the geometry using the deleteAttribute method available on BufferGeometry and any class inheriting from it:
const waterGeometry = new THREE.PlaneGeometry(2, 2, 512, 512)
waterGeometry.deleteAttribute('normal')
The normal is unaffected and we’ve freed up some memory.
Color
In fragment.glsl, put back the color on gl_FragColor:
void main()
{
    // ...
    gl_FragColor = vec4(color, 1.0);
    // ...
}
Point light
That directional light looks good, but a point light slightly above the center of the sea would look even better.
Replace the #include ../includes/directionalLight.glsl by #include ../includes/pointLight.glsl and call the pointLight() function with the following parameters:
#include ../includes/pointLight.glsl

void main()
{
    // ...

    light += pointLight(
        vec3(1.0),            // Light color
        10.0,                 // Light intensity,
        normal,               // Normal
        vec3(0.0, 0.25, 0.0), // Light position
        viewDirection,        // View direction
        30.0,                 // Specular power
        vPosition,            // Position
        0.95                  // Decay
    );

    // ...
}

Axes Helper
Remove the AxesHelper instance:
// // Axes helper
// const axesHelper = new THREE.AxesHelper()
// axesHelper.position.y += 0.25;
// scene.add(axesHelper)
Tone mapping
On the renderer, set the toneMapping to THREE.ACESFilmicToneMapping for more punchy colors:
const renderer = new THREE.WebGLRenderer({
    canvas: canvas
})
renderer.toneMapping = THREE.ACESFilmicToneMapping
Conclusion 51:48
We are done with the lesson. What a huge improvement it was compared to the initial raging sea.
Remember that computing normals depends on the initial data and we wouldn’t have been able to use the neighbours technique that easily if we hadn’t been using a grid.
Later, we are going to compute normals on a more complex geometry, but that’s for another lesson.
It’s also very easy to make a mistake along the way because we code a lot without seeing anything on screen.
We went through a lot of steps and created many variables for the sake of learning and understanding, but the code can be reduced drastically. Feel free to optimize it.
Finally, computing normals like this comes at a cost. We are doing the wave elevation formulas three times and each one is also calculating a bunch of perlin noises. Keep an eye on performance, don’t put too many vertices, and don’t call perlin noise functions too much.
Going further 54:00
As always, feel free to improve on the lesson.
Here are some suggestions:
- Test different colors
- Tweak the
shift - Improve the way we handle the color gradient
- Put some objects floating on the surface of the sea (you’ll have to calculate the wave in JS)
- Make the depth of the waves more emissive
- Add more lights
- Animate the lights